Are you using Leadpages, but can’t figure out how to count the conversions in Google Analytics 4 (GA4) or Adwords? Your worries are over. This article will teach you how to track all conversions using both GA4 and Google Tag Manager (GTM).
As we all know, Google Ads is an online advertising platform developed by Google. Sadly, Leadpages does not provide a native functionality to send conversions data into Google Ads or Analytics directly. However, it’s actually very simple to integrate Leadpages with GA4 and GTM, which is great news for everyone! GTM requires more steps but don’t worry. We’ve got you covered with step-by-step instructions and pictures.
Tip: Familiarize yourself a bit first with Leadpages, Google Analytics 4, and Tag Manager. It will definitely help!
Let’s begin!
Table of Contents
Step 1: Get your Measurement ID from your GA4 platform
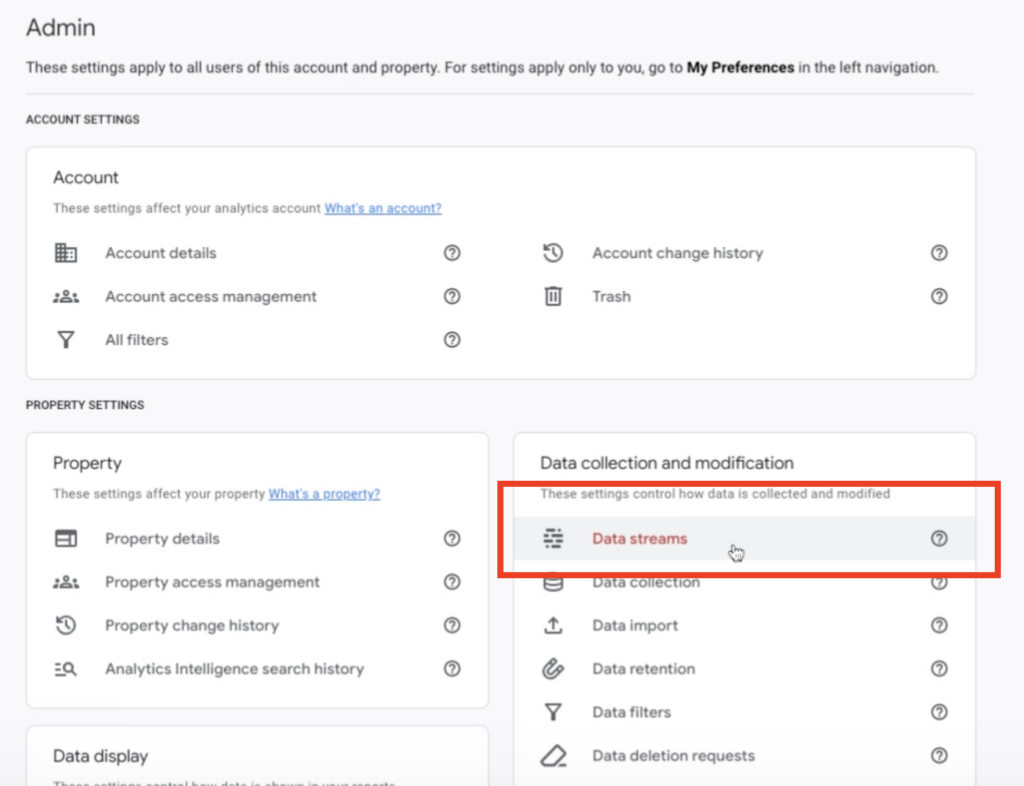
A. First, go to your GA4 account. On the Admin page, select Data Streams.

B. Select the data stream you want to connect.

C. Copy the Measurement ID

Step 2: Go to Leadpages for the page you want to connect and select “Settings”

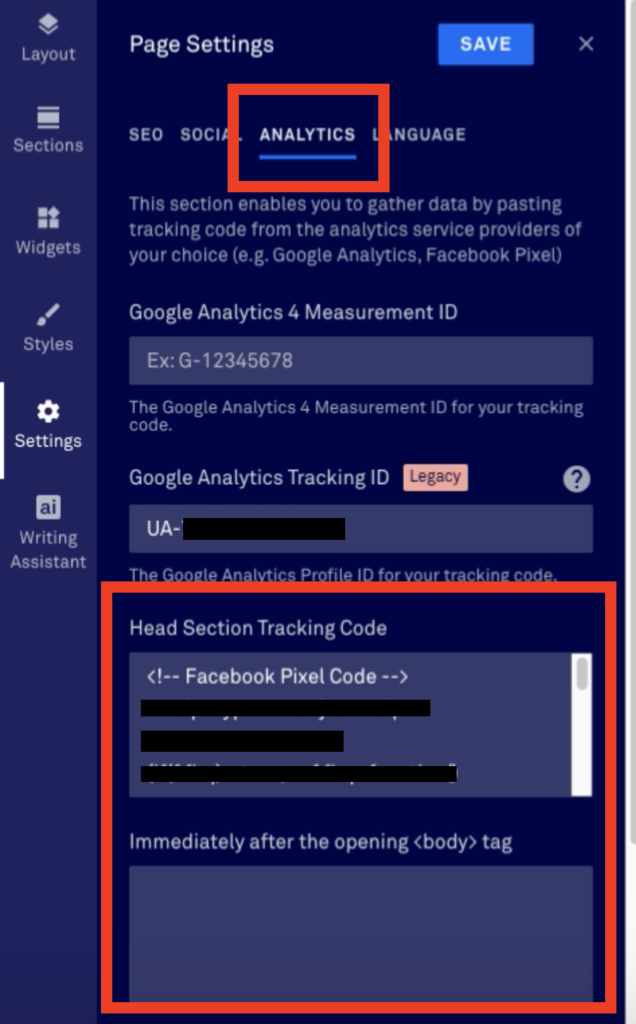
Step 3: Go to “Analytics” and paste the Measurement ID

Be sure to click Save. That’s it for this part of the process!
Step 4: Create a Google Tag Manager account

Note: If you already have one, just make sure you still remember the log-in details in order to access your GTM account!
Step 5: When you're done creating your account, you'll have your own unique GTM code. Copy the code from the two boxes

Step 6: Adding Google Tag Manager to Leadpages
A. Return to Leadpages and follow the same steps as above: select the page you want to track conversions in or you may create a new Leadpage. Then, click on Settings, and then select Analytics.
Note: If you choose to create a new Leadpage, you will be brought directly to the page editor once you choose a template.

B. Now paste the copied code into the two boxes.

C. When done, click Save.
Step 7: Create a GTM Variable
Go back to the Tag Manager website and click Variables (located at the lower left side of the page).

A. In the ‘Variables’ section, click New (located at the lower right side of the page).
B. Click on the Variable Configuration container and when options pop up at the right side of the screen, choose Custom javascript.

C. After clicking Custom JavaScript, the text area will appear.

D. Paste this script inside the text area.

It will look like this.

E. Name your variable “LP – submit button text” and click Save.

Step 8: Create Trigger 1
After clicking Save, go back to the main page of Tag Manager and select Triggers.

A. Just like in Variables, click New (located at the upper right side of the page).

B. Click within the Trigger Configuration box. Choose All Elements.

C. Choose “Some Clicks” and “Built in Variable.”

D. Now, from the right side of the screen, choose Click Classes.

E. Paste this text beside the Contains box that appears.


It will look like this.

F. Name the trigger as “LP – Submit button click,” and click Save.

Step 9: Create Trigger 2
This will be the last trigger for conversion. The process is the same as Step 8, but this time when choosing trigger type, select Custom event.

A. On the Custom Event page, you’ll see the Event name section. Type this text in the box:

B. Then, click Some events and choose the variable “LP – submit button text” that we created in step 8.
C. Next, choose matches RegEx on the dropdown menu and type “(hank|ubmitt)” on the third box to the right.
Note: “(hank|ubmitt)” is a text from CTA buttons. If your button instead contains the “Get it now” value, you will want to use this text:“(hank|ubmitt|Get it now)”
When finished, it should look like this:

D. Name the second trigger “LP – Successful form submit” and click Save.

Step 10: Create a listener tag
This is the last step before you will be able to track your conversions.
A. Click Tags on the left sidebar and click New.

B. Click on the tag in the configuration box and select Custom HTML as the tag type.

C. When the text field appears, paste the following text:

It will look like this:

D. In the Triggering area located below the Tag text box, select “LP – Submit button click,” which we created in Step 8.

E. Name your new tag “LP -Button click listener.”

F. Click Save on the top right corner. Now you’re finished setting up the tagging in GTM!
Reminder: Why we create triggers and variables
We set up triggers and variables to monitor what message is returned from a Leadpages form. If someone unsuccessfully fills out the form, the conversion will not count.
In other words, if the form is submitted and:
- An error appears – the conversion is not successful.
- No error message appears – the conversion is successful.
This way we can determine when a conversion works perfectly and send this information to GA4 or Google ads (Adwords).
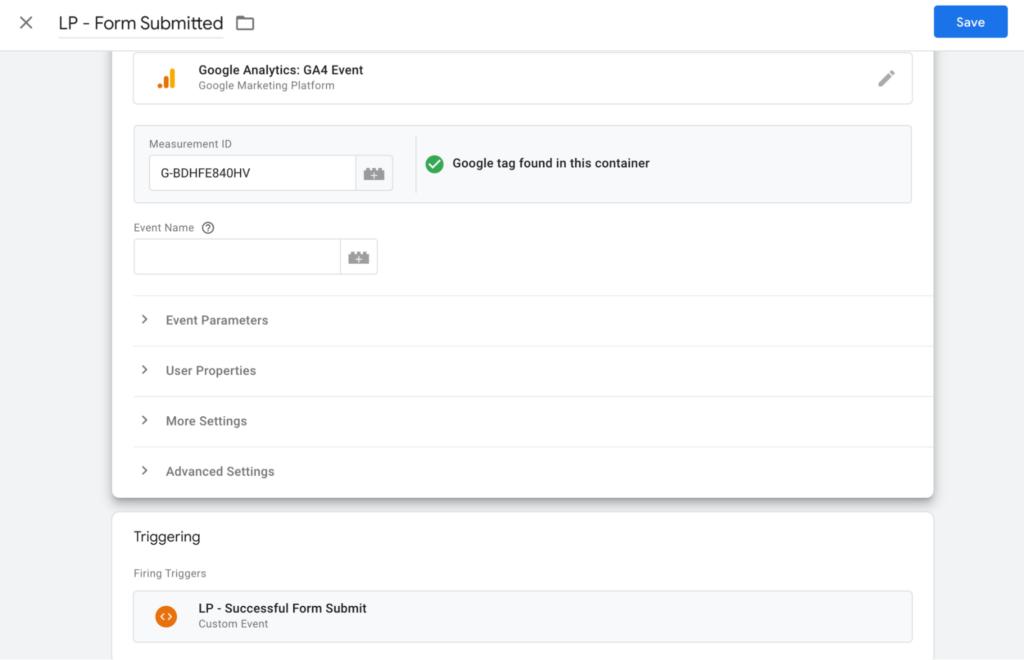
Step 11: Now set up a Google Analytics event tag, or use a Google Ads conversion tag, and use the trigger “LP-Successful form submit” in Google Tag Manager
Here’s an example of how we use the trigger for the Google Analytics tag:


Step 12: Create a new goal in Google Analytics
A. Sign in to Google Analytics.
B. Click Admin, and navigate to the desired view.
C. In the VIEW column, click Goals.

D. Click + NEW GOAL or Import from Gallery to create a new goal, or click an existing goal to edit its configuration.
E. Create a custom goal setup and name it.
F. In the Goal Details, choose Event and set the fields to match the fields in Step 11 that you created in Google Tag Manager.
Using our example from Step 11, the goal details would look like this:

Make sure to link Google Analytics with Google Ads (AdWords) to see Leadpages conversions in Google Ads.
Conclusion
That’s it! Hopefully you learned everything you need to know to track Leadpages goals with Google Analytics. If you have any questions, https://themathergroupllc.com/contact/.
You might also find these resources helpful:


